Customer Productivity and
User Experience
User Configurations
Administrators can add SigmaNEST configuration profiles that can be selected when logging into the software. Configurations allow you to change SigmaNEST configuration options, such as paths, machines, import settings, and defaults for specific configurations. Each configuration can have different configuration options.
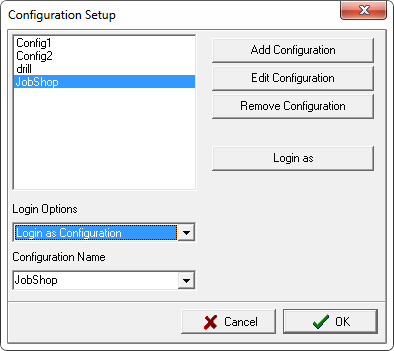
For example, an Administrator can add the JobShop and Floor configurations and set the Login Option to Ask Configuration Name. The JobShop and Floor configurations are configured with different machines and directory paths. Depending on which configuration a user logs into, the available machines, parts, and Work-spaces are different. ![]() Click Here to see the tutorial video.
Click Here to see the tutorial video.
Security Role Settings
Administrators can now assign security roles to users. These roles determine what a user can do within the application.
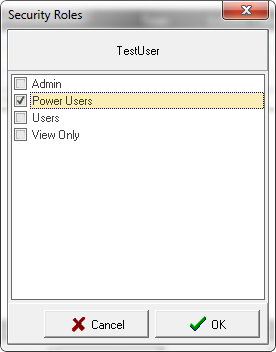
The following Security Roles are available:
- Admin. This role has full administrator rights and can access all areas of the application. The Admin role can also add/edit/delete users, change security role settings, and edit user and system configurations.
- Power User. This role has access to most all areas of the application and can edit and change configurations as needed. A Power User cannot access User Management.
- User. This role can create new items and edit existing items in most areas of the application. For example, Users can create new work orders, add and edit parts, create new Work-spaces, and Post. Users cannot access application configurations, Technology Setup, and User Management.
- View Only. This role can only view existing items. For example, View Only users can check the status of a Work Order, but they cannot make any changes to it or create a new one. A View Only user is not able to Post.
 Click Here to see the tutorial video.
Part Parameters
The following features have been added to the Part Parameters dialog box:
- BHQ Lookup(Leadin/out tab). BHQ (Bolt Hole Quality) lookup can be enabled on a part to help identify holes in parts and better indicated lead-ins on that section of the part.
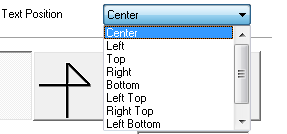
- Text Position (Grain tab). Text added to parts can now be quickly moved to a different position on the part by using the Text Position drop-down list and selecting the position.
Function Keys for Manual Nesting Mode
New function keys have been added when manually nesting parts. See the table below for the new function keys.
| Function Key | Action | Function Key | Action |
|---|---|---|---|
| F1 | Rotate part(s) 90 degrees | F6 | Rotate part(s) -5 degrees |
| F2 | Rotate parts(s) -90 degrees | F7 | Rotate part(s) 1 degree |
| F3 | Rotate part(s) 10 degrees | F8 | Rotate part(s) -1 degree |
| F4 | Rotate part(s) -10 degrees | F9+Arrow Keys | Rotate part(s) clockwise |
| F5 | Rotate part(s) 5 degrees | F10+Arrow Keys | Rotate part(s) counterclockwise |
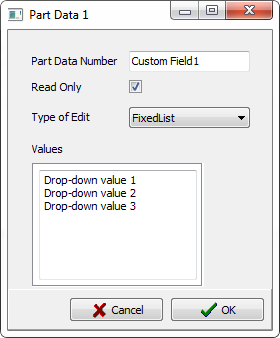
Customizable Part Data Fields
The SigmaNEST Configuration Part Data tab allows you to customize the 18 part data fields used to store additional part data in the Part Parameters. You can change the field name, set it to read-only, or change it to a drop-down list of values you enter. You can also configure the part data fields to only accept certain characters or to only use Boolean values, such as Yes/No, or True/False.
![]() Click Here to see the tutorial video.
Click Here to see the tutorial video.
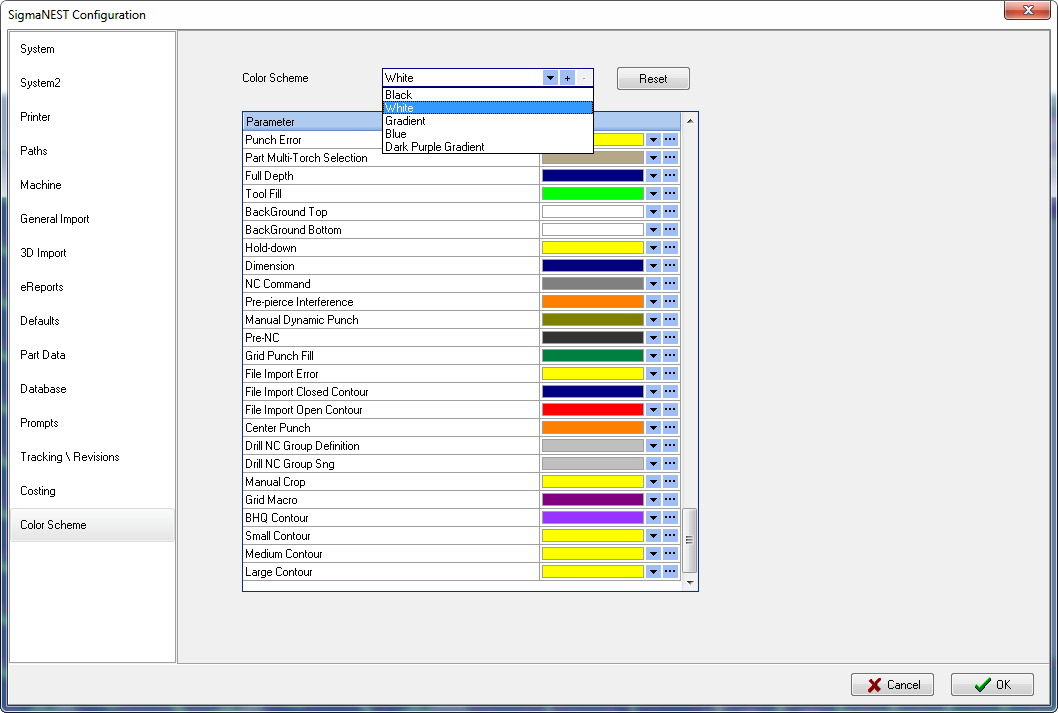
Color Schemes
You can now configure color schemes that are used by SigmaNEST to customize the way the program looks. By default, the White, Black, Gradient, Blue, and Dark Purple Gradient color schemes are available. You can also create your own scheme by adjusting the colors for SigmaNEST parameters, such as tabs, marks, left kerfs, and BHQ contours, and then clicking the plus sign (+) and saving the settings as your own custom color scheme.
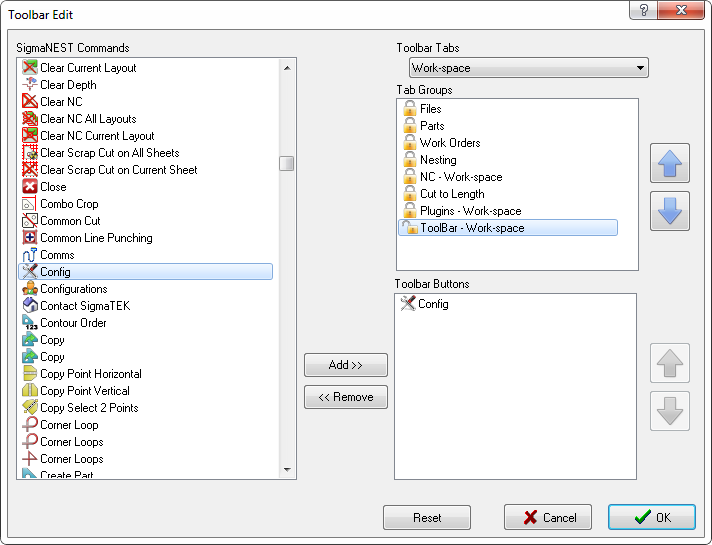
Toolbar Customization
The SigmaNEST toolbar can be customized to add new commands and modify the tab groups layout for each SigmaNEST tab. For example, you can move the Parts group in the Work-space tab so it displays after the Files group and before Work Orders or add the Config command to the Work-space tab. ![]() Click Here to see the tutorial video.
Click Here to see the tutorial video.
Work Order Part Lock Duration
You can now set the time (in minutes) that access to parts is locked for parts added to a work order. Other users that try to add a locked part to another work order are notified the part is locked. The lock is lifted when the specified time runs out or when the work order is posted to a machine. You can specify the lock duration from the Defaults tab in the SigmaNEST Configuration.
Remnant Marking
You can use Remnant Marking to add text marking to created remnants. The Remnant Marking is configured from the Auto NC dialog box on the Remnant Marking tab or from the Nest Remnants dialog box in the Remnants Marking section.
Interoperability
Import Multi-body Sheet Metal Parts
When importing a SolidWorks multi-body part file, SigmaNEST can now split it into separate parts and also set the correct material type. If the material type does not exist in SigmaNEST, you are prompted to add it.
3D Import Filename Filter
A Filename filter has been added to the Keyword Filter in the SigmaNEST Configuration. This allows you to include or exclude files when importing from an external CAD application, such as SolidWorks.
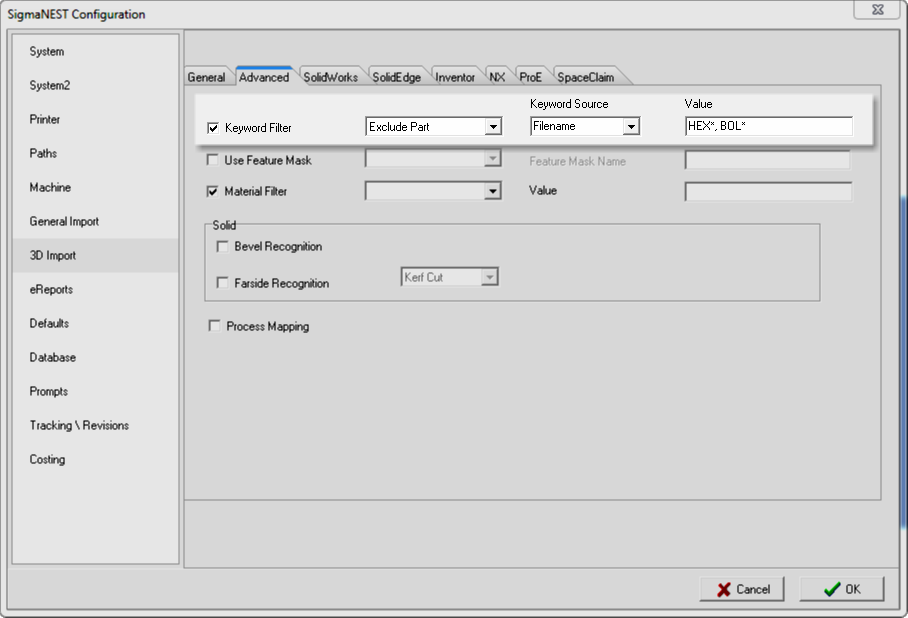
For example, if a CAD file has bolts in it that you do not want to import, you can exclude file names with "hex" and "bol" in the file name. SigmaNEST ignores all files that match this criteria during import. ![]() Click Here to see the tutorial video.
Click Here to see the tutorial video.
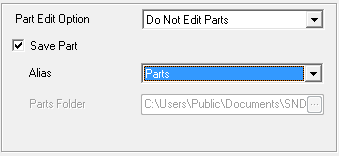
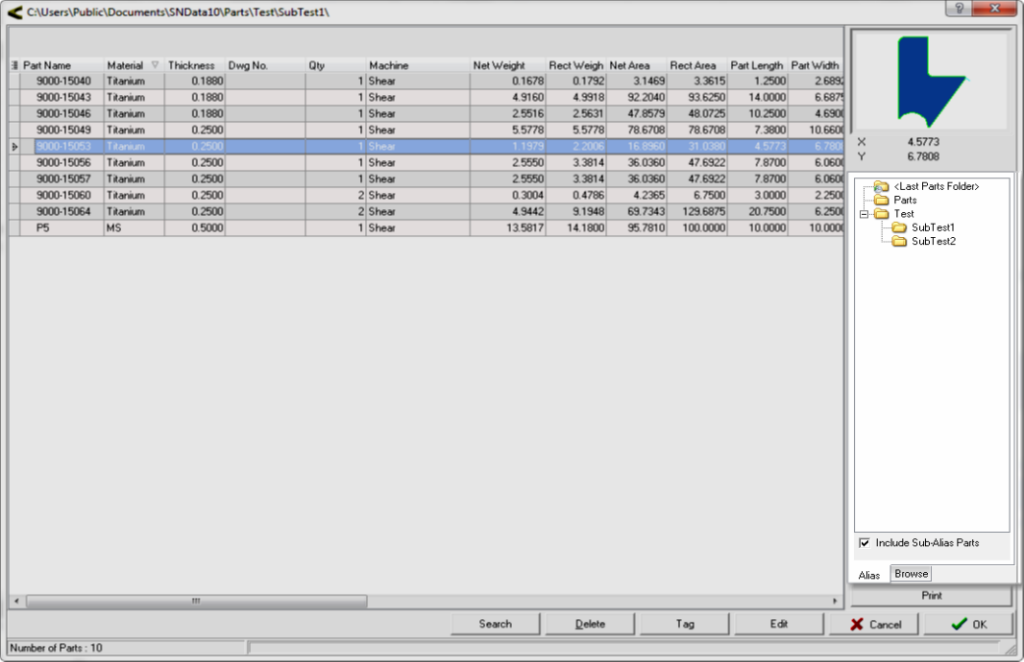
Save DXF Files to Alias and Sub-Alias Folders on Import
When importing DXF files using Interactive Mapping or Desktop Mapping, you can save the files to an Alias or Sub-Alias folders.
Click on the Options tab in the Interactive Mapping or Desktop Mapping dialog box and select Do Not Edit Parts from the Part Edit Option drop-down list. Click the Save Part check box and select the Alias or Sub-Alias folder from the Alias drop-down list.
![]() Click Here to see the tutorial video.
Click Here to see the tutorial video.
Save Import Settings
You can also save the default import settings so you don't need to select them every time you import a part. Once you have the import settings the way you want them, click Save Desktop As at the top of the Interactive Mapping or Desktop Mapping dialog box and enter a name to save the settings under.
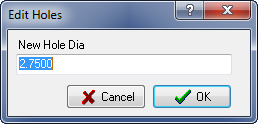
Edit Holes
You can now use the Edit Holes function (![]() ), located on the Parts tab, in the Part Mode group, to quickly change the diameter of the holes on a part.
), located on the Parts tab, in the Part Mode group, to quickly change the diameter of the holes on a part. ![]() Click Here to see the tutorial video.
Click Here to see the tutorial video.
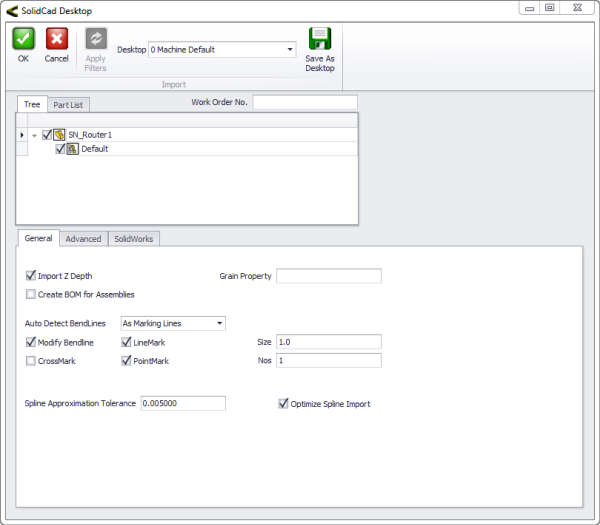
SolidCAD Desktop
Importing SolidWorks files now opens the SolidCAD Desktop dialog box in SigmaNEST. The SolidCAD Desktop allows you to view the parts being imported, configure import settings, assign Work Order Numbers, and save the import configuration to a profile so you can easily apply your import settings to all SolidWorks parts you import.
Core Enhancements
New Nesting Engines
New nesting engines are now available that offer speed improvements, better yields, and faster nesting than the previous generation of auto nesting engines. The following nesting engines have been added to the Auto Nesting Type drop-down list in the SigmaNEST 10 Task Parameters:
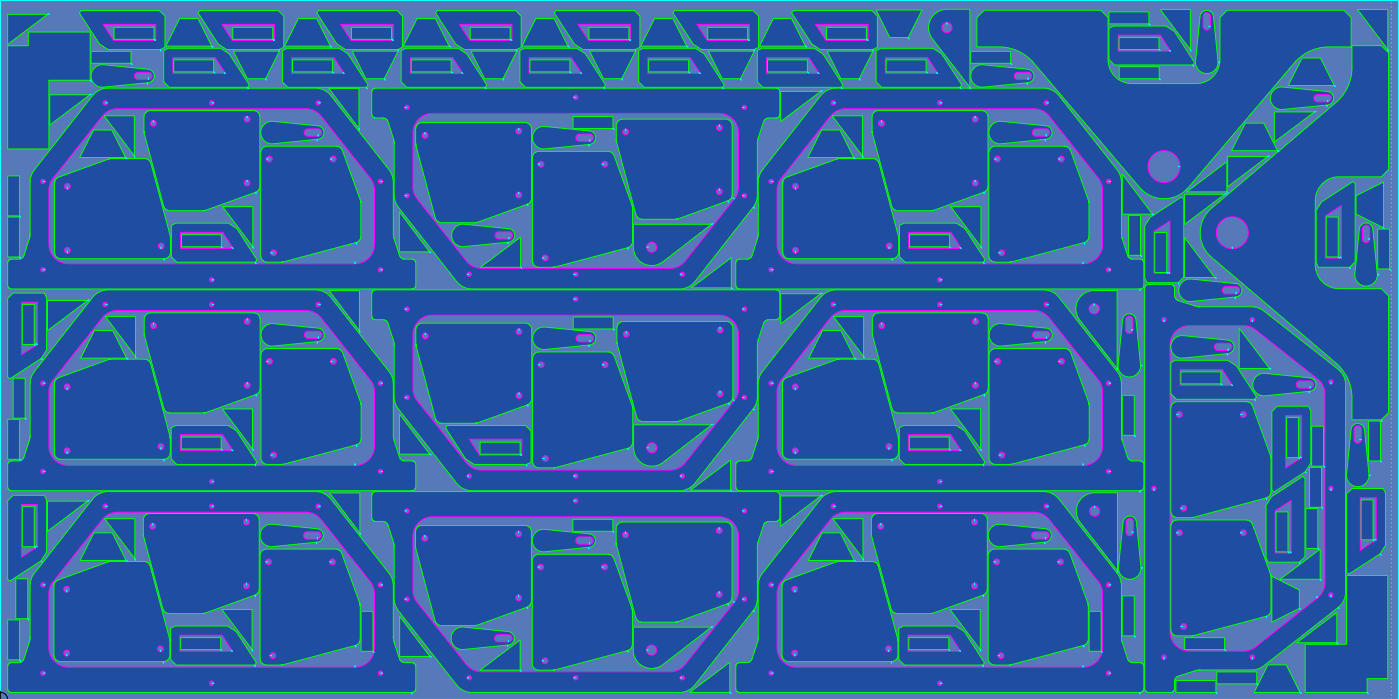
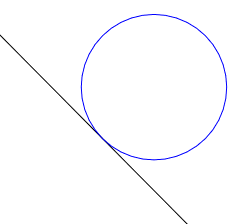
- HD-TS (HD True Shape). Nests parts on a part-by-part basis based on the specified Part Order set in the Advanced Nest Settings of the Task Parameters. The parts are fitted together as closely and efficiently as possible while retaining specified clearance values. The following image is an example of HD-TS nesting using the Area Part Order.
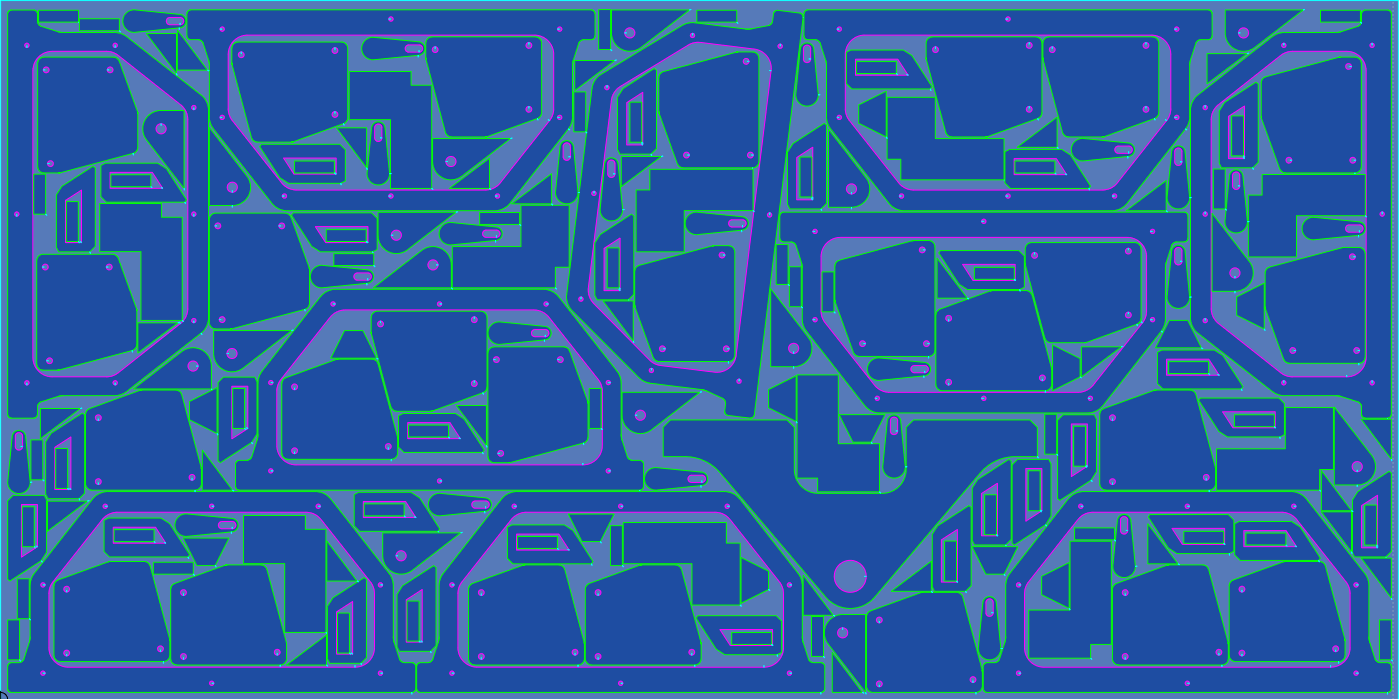
- HD-TSPlus (HD True Shape Plus). Nests parts on a part-by-part basis similar to HD True Shape. However, a more advanced part fitting algorithm is applied that can yield better nesting results in certain situations. The following image is an example of HD-TSPlus nesting using the Area Part Order.
Parts List and Bill of Materials Aliases and Sub-Aliases
You can now add Alias and Sub-Alias folders to the Parts List and Bill of Materials list to better organize your parts and BOMs.
Work Order Enhancements
Two new columns have been added to the Work Orders List. The Status column shows the status of a work order and the Qty Remaining column shows the amount of parts remaining for the work order.
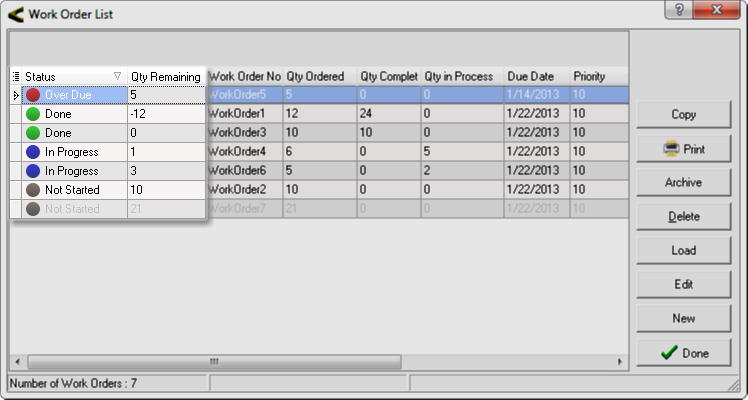
The following statuses display in the Status column:
- Done (Green). The work order is complete.
- In Progress (Blue). The work order is in progress but not yet complete.
- Over Due (Red). The work order is past the due date and over due.
- Not Started (Gray). The work order is not yet in progress.
- Greed Out. The work order is on hold.
You can also now right click a work order from the Work Order List and select On Hold to place it on hold or Release to release the hold on the work order. ![]() Click Here to see the tutorial video.
Click Here to see the tutorial video.
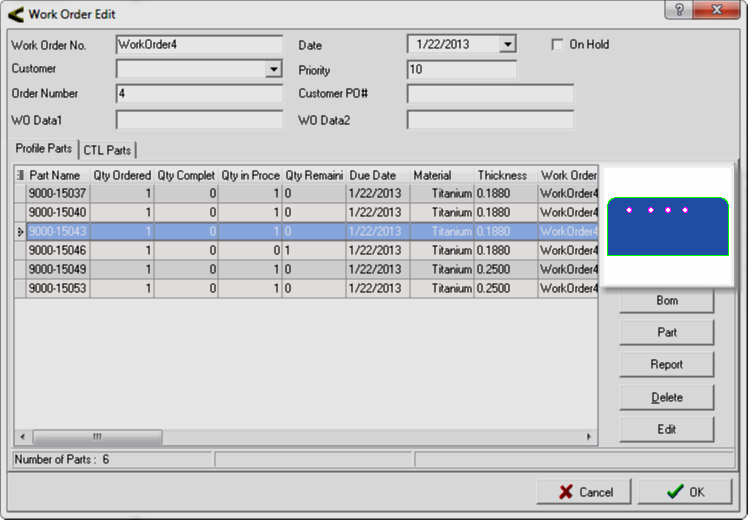
Editing a Work Order
When editing a work order, a preview of the part now displays on the right side of the Work Order Edit dialog box.
Inventory Management Enhancements
The following enhancements have been made to the inventory and costing features of SigmaNEST.
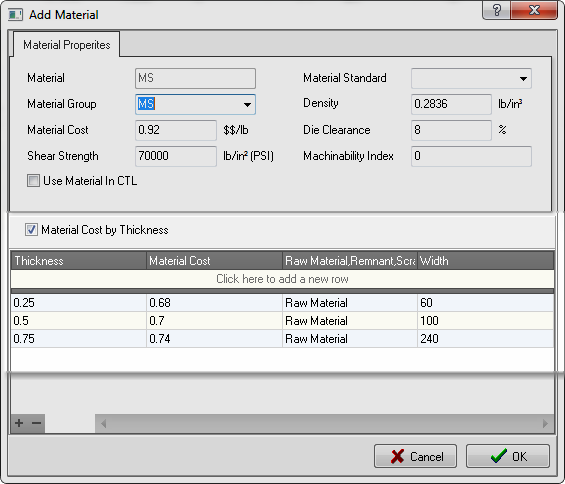
Material Cost by Thickness
You can now calculate the cost of a material based on its thickness by entering a range of thickness and cost values when adding or editing a Material in Technology Setup. ![]() Click Here to see the tutorial video.
Click Here to see the tutorial video.
Sheet Parameters - Material Cost Calculator and File Links
The following new features have been added to Sheet Parameters:
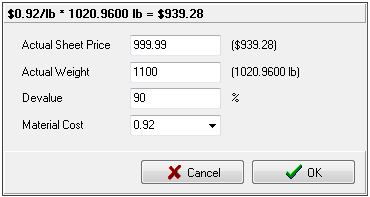
- The Material Cost Calculator (
 ) allows you to adjust the Actual Sheet Price, Actual Weight, Devalue percentage and Material Cost. This quickly updates the cost for specific sheets and remnants without changing the overall cost of the material in Technology Setup.
- The File Links button, located in the bottom left of the Sheet Parameters dialog box, allows you to link items, such as a PDF of the material's specifications, to the sheet.
Material Standards
Material standards can now be associated with materials when adding a new material or editing an existing material in Technology Setup. The material standard allows you to associate the ASTM (American Society for Testing and Materials), EN (European Standard), and UNS (Unified Numbering System) material standard designation with the new or existing material.
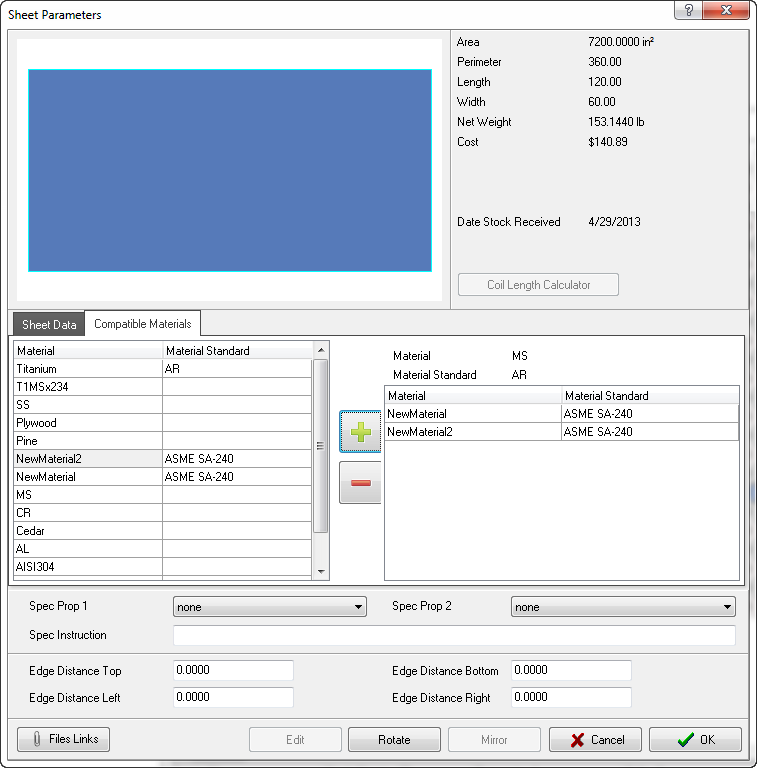
Compatible Materials
When viewing the Sheet Parameters for a sheet, you can now assign compatible materials by clicking the Compatible Materials tab. A list of compatible materials and their standards (if assigned) is shown. Select the material that is compatible with the sheet you are using and then click the plus sign (+) to add the material. When you add the sheet to a new nesting task, you can also nest on the sheets that you assigned as compatible materials. ![]() Click Here to see the tutorial video.
Click Here to see the tutorial video.
Remnant Geometry
You can now store sheet geometry files for remnants in the SigmaNEST database as compressed (.zip) or uncompressed files. You can also store the files as an external zip file outside the database. The geometry data file type can be set to SigmaNEST, CDL, or DXF.
To access the Database settings, from the Tools Help tab, click Config and then select the Database tab.
Best Sheet Options
You can now specify Best Sheet options from the Sheets List in Task Setup. SigmaNEST scans all available sheet sizes and chooses the sheet that provides the lowest scrap rate. You can choose from the following options:
- No Best Sheet. SigmaNEST does not use Best Sheet settings. You must specify the sheet settings or nest with the default settings.
- Best Sheet Mixed. SigmaNEST analyzes all available sheets and picks the best one based on yield.
- Best Sheet Fixed. SigmaNEST analyzes all available sheets and picks the best one based on size.

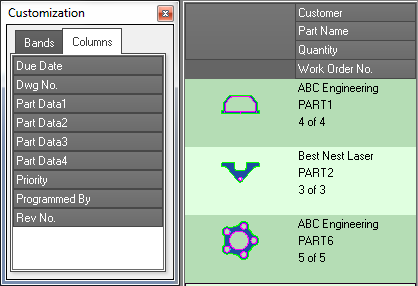
Customizable Parts Bar
The Parts Bar, which is displayed to the right of a nesting task and by default shows the part name, geometry, and quantity of the parts for the task, can now be customized to show additional information, such as the Customer, Due Date, Priority, and custom Part Data information. ![]() Click Here to see the tutorial video.
Click Here to see the tutorial video.
Remnant Selection
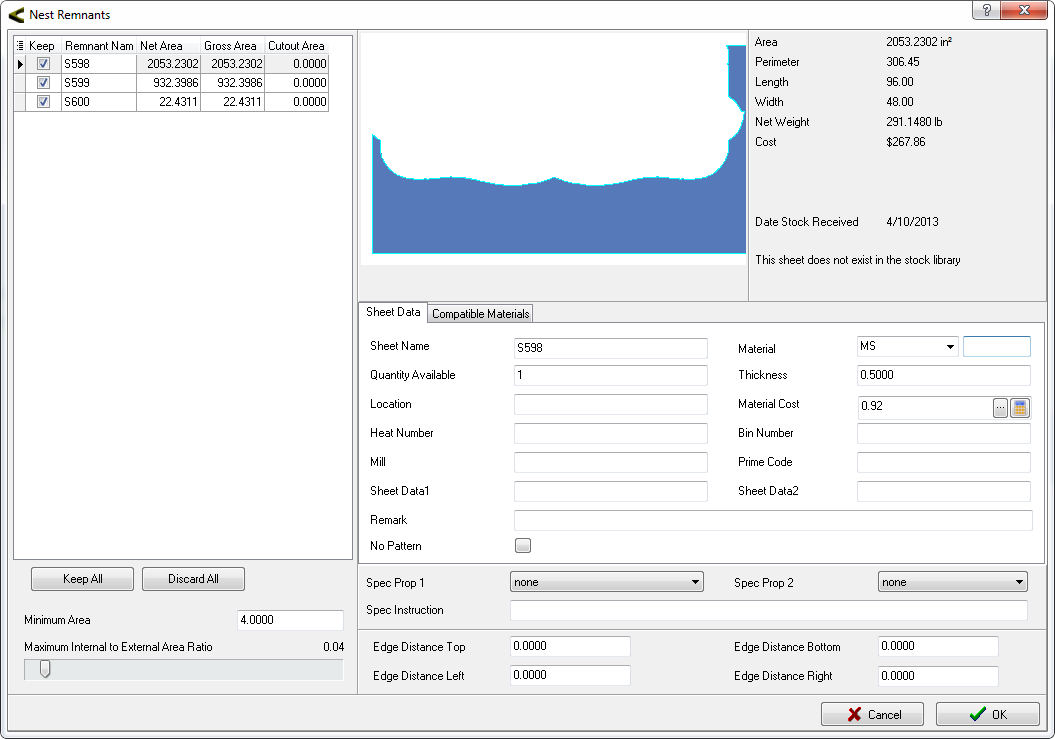
When configuring the General Crop Settings, the Nest Remnants dialog box now opens if you select the Create Remnant checkbox. The Nest Remnants dialog box displays list of remnants for your task and gives you the option to keep or discard the remnants. When you select a remnant from the left table, a graphical preview of it displays to the right. You can also view other information, such as the Net Area, Gross Area, Length, Width, Cost, the Sheet Data, and Compatible Materials.
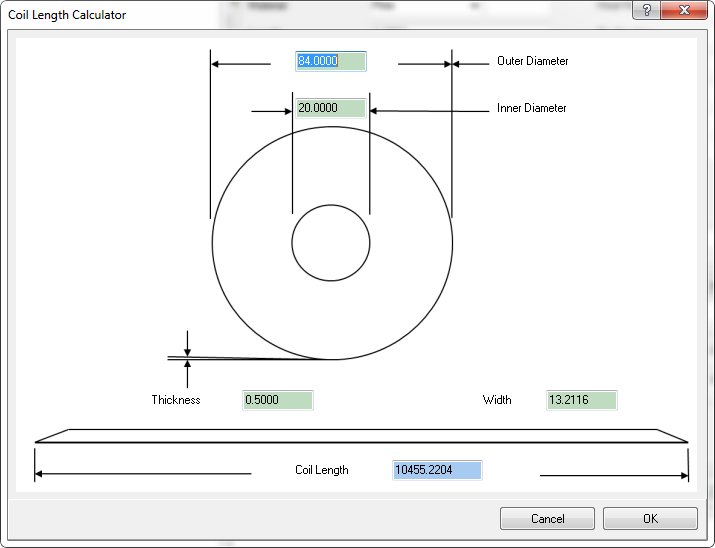
Coil Length Calculator
You can now calculate the coil length when adding a new coil sheet. When you select the This is a Coil check box, the Calculate Length button is enabled. Clicking this button opens the Coil Length Calculator dialog box. From here, you can enter the Outer Diameter, Inner Diameter, Thickness, and Width to calculate the Coil Length.
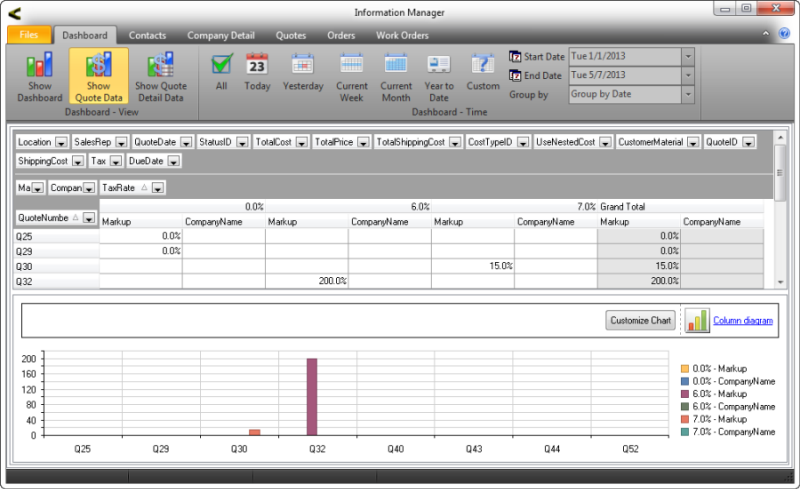
Information Manager/Quoting Enhancements
The Information Manager has been enhanced to allow you to more easily manage quotes, contacts, company, order, and work order information. You can also quickly customize the look of the views used by the Information Manager. For example, you can edit the template used for the Address Cards view in the Contacts tab and change the default address fields to customize the information displayed.
The SigmaNEST quoting system and Information Manager is available with the purchase of the optional quoting module. ![]() Click Here to see the tutorial video.
Click Here to see the tutorial video.
New Punch Features and Enhancements
The following are new or enhanced features for punch machines.
Tool Viewer Enhancements
When viewing a pre-tooled Work-space, the Tool Viewer now displays missing tools in red. You can select these missing tools and quickly create the tool and add it to your tool database. The Tool Viewer also now allows you to select a missing tool and then click Auto Replace. This allows SigmaNEST to automatically replace the tool with the closest match in your tool database.
Tool Adapters
You can now create Tool Adapters in the Tool Manager. Tool Adapters allow a tool to be added to a turret if there is no open space by using the adapter. To create a tool adapter, open the Tool Manager, click the Adapters tab, and then click New. From the Add Adapter dialog box, you can configure the new adapter and add it to your tool database.
Auto Turret Generation
You can enable Auto Turret Generation on the Punch Parameters tab in the Task Parameters. This allows SigmaNEST to automatically generate a turret with the tools needed to process the parts for the task. When you Auto Tool or manually tool the parts, SigmaNEST creates a new turret that you can export and save if necessary
Export Active Turret.
When you click Active Turret to view the active turret and the tools loaded into it, you can also now Export the active turret to a file so it appears in the Tool Manager. This feature is used to save a turret generated by Auto Turret Generation.
Die Management Redesign
Die Management has been redesigned to make it easier to create dies for tools listed in the Tool Manager. When you edit an existing tool, click on the Dies tab to view the dies for the tool. You can filter Dies by the Material and Die Type or click the plus sign to add a new Die to the table.
Tool Ranking.
When editing an existing parting or nibbling tool a ranking can now be assigned when using the tool for external/internal parting and nibbling. When you create a new task for a punching machine, you can enable Tool Ranking on the Punching Parameters tab of the Task Parameters. When you tool the parts, SigmaNEST automatically uses each tools rank to determine when best to use it on the parts.
Improved Destruct
The Punch Parameters dialog box now has a Destruct tab that contains all the settings used to manage the destruction of excess material. Complex Auto Destruct, In The Box Tooling, and Number of Tools vs. Number of Hits settings can all be used to customize how SigmaNEST destroys the materials.
Part Handler
The Part Handler allows you to configure the sequence used to automatically remove parts from the sheet after they have been processed. You can also configure the Part Handler to load a sheet into the machine bed or pick up the remnant sheet once all parts have been cut and removed.
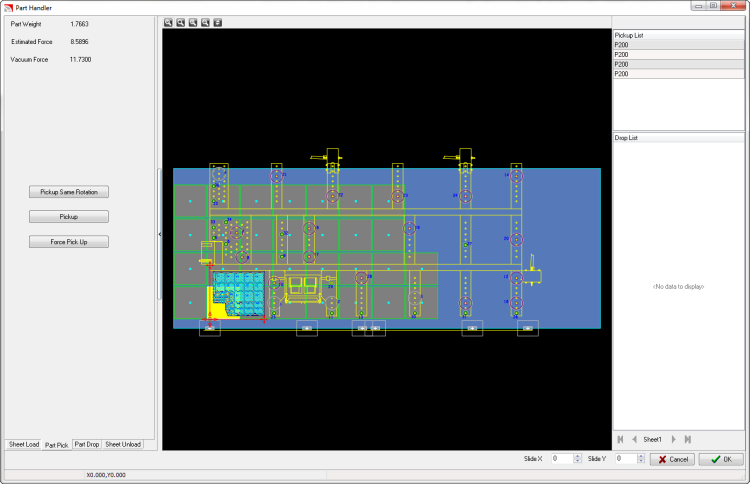
You can also pre-program parts for use with the Part Handler by specifying the drop-hit location and the pickup sequence. When these parts are nested and tooled, the programed sequence is then automatically applied to the parts.
New CAD Functions
The following functions have been added to the Geometry group on the CAD tab.
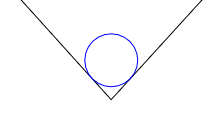
Circle Tangent 2 Entities, 1 Point
The Circle Tan 2 Entities, 1 Point function draws a circle that is tangent to two selected entities and lies on one selected point.
Circle Tangent 1 Entity, 2 Points
The Circle Tan 1 Entity, 2 Points function creates a circle that is tangent to the selected entity and lies on 2 selected points.
Grid Macro
You can use the Grid Macro Generate function to create small amounts of code and spread it across a nested sheet of similar parts. This is helpful for machines with limited memory that cannot process large amounts of NC code. This feature is located on the Nesting NC tab in the Advanced NC group.
Machine Compatibility
Technology Editor
The Technology Editor (located under the machine name in the Machine Parameters tab of Technology Setup) has been enhanced to allow easier updating of materials, processes, quality, and processes parameters, that are supported by the machine.
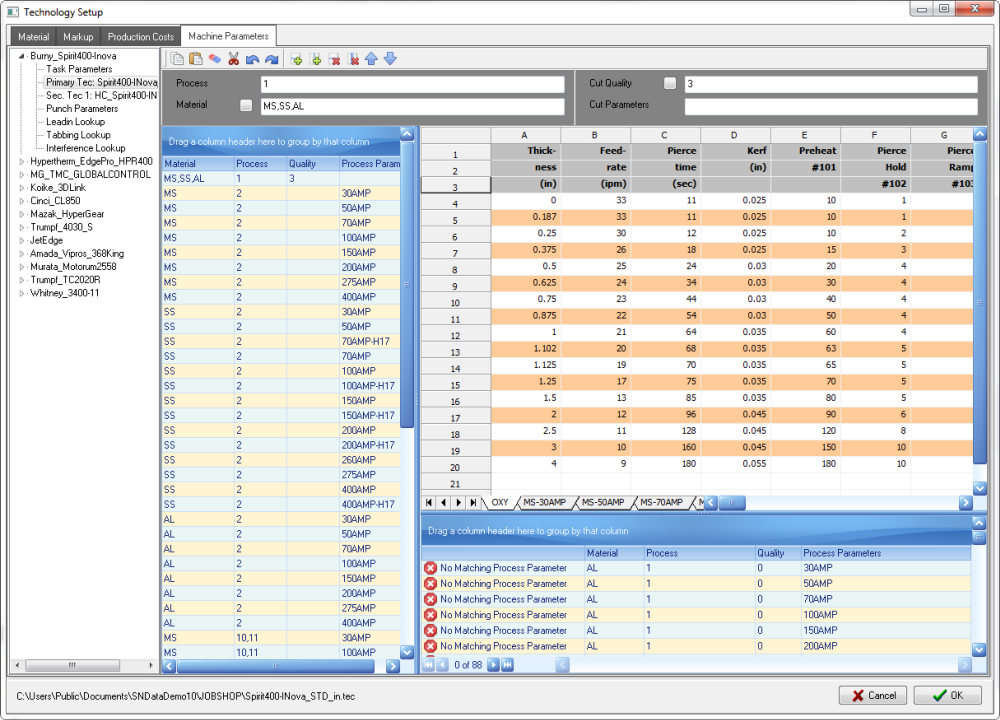
The left column now shows the name of the technology file in the expanded Machine Parameters. When selected, the path to the file is displayed at the bottom of the Technology Editor dialog box.
Integration
Color Offload
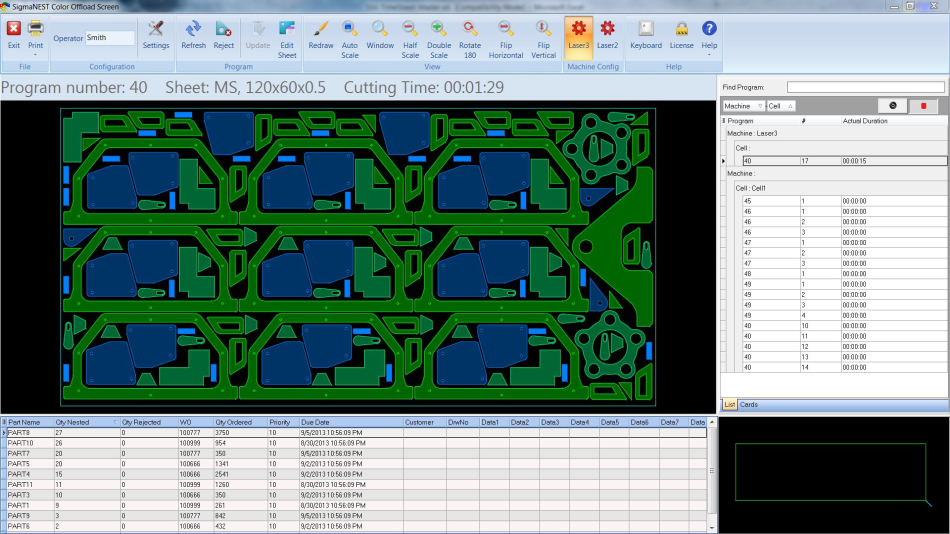
Color Offload has the following new and enhanced features:
- Actual time recording.
- Status bars.
- Sheet edit capability.
- Touchscreen support.
- eReport functionality.
- Profile support.
- Bar-code search.
- Display only programs scheduled by Load Manager.
Load Manager
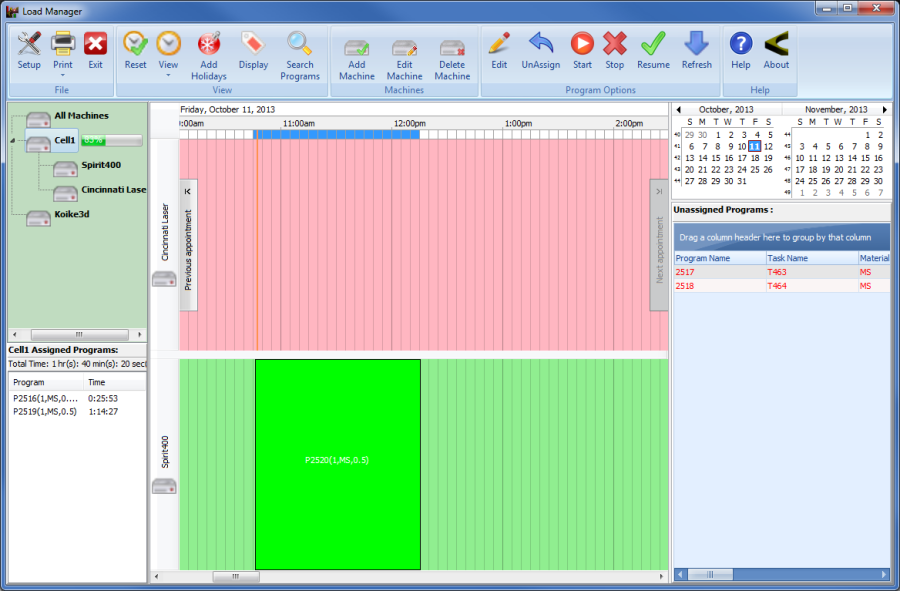
Load Manager has the following new features and enhancements:
- Links with Color Offload.
- Quick information views.
SimTrans
SimTrans has the following new features and enhancements:
- Additional Plug-in support.
- Staratix integration.
- Transactions now support file transfers from database.
- Events are now logged to the database.
- Contact Management transactions.
- Caps to event logs.
- SN85 Source improvements.